How to Adjust String Height (Acoustic or Classical Guitar)
Changing the string height can have a drastic affect on the feel and functionality of the guitar. If the strings are too high, the instrument is a chore to play. If they are too low, they may produce too much buzz and a lack of sustain. There is always a middle ground for every guitar type and player – one that is comfortable and functional.
What You Will Need
- Steel ruler and/or feeler gauges
- Pencil
- Sandpaper
- Callipers (for marking out measurements)
Adjusting the string height on an acoustic guitar can be a little more involved than on an electric. In most cases, if you want to lower the string height, you must sand down the saddle. Other times there will be shims that can be removed. Alternatively, when raising the string height, shims are usually used for the job, unless a new saddle is required.
Acoustic guitars can develop much bigger problems where shimming will not be a reasonable or effective method of string height adjustment. If in doubt, take it to a professional for an assessment.
The Procedure
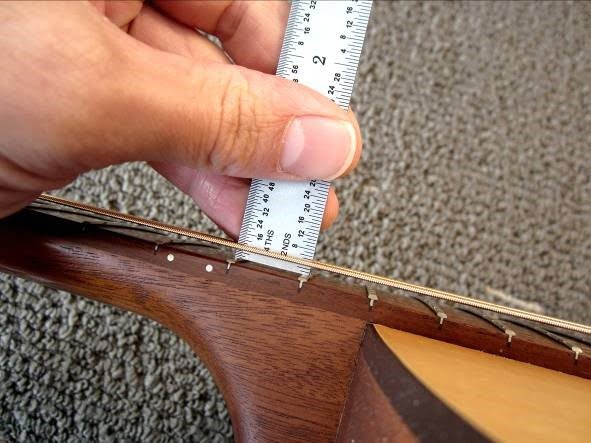
Only adjust the string height once the relief is correctly set. With the capo on the 1st fret, take a steel ruler (or feeler gauges) and place it on the 12th fret, next to the #6 string as pictured below. Write down the measurements. Now do the same for the #1 string.
A common preference for the string height on an acoustic guitar is anywhere between 7/64″ – 4/64″ at the #6 string, relatively tapering down to 5/64″ – 4/64″ at the #1 string. You will develop a taste for how you like the action on an acoustic guitar. Higher action produces a clearer tone and louder volume. Lower action facilitates ease of play. For this example, set it to 5/64″ at the #6 string, and 4/64″ at the #1 string, which is a medium/low action. The following example used as a reference.
Keep in mind the following specifications are meant to be a guide. They should not be construed as hard-and-fast rules, as players’ subjective requirements often differ.
Calculate the String Height Changes
Acoustic Guitar Setups | #6 string | #1 string |
The current string height (example) | 6/64” | 5/64” |
The target string height (suggestion) | 5/64” | 4/64” |
The difference between them | 1/64” | 1/64” |
To lower the string height by 1/64″, remove exactly TWICE that at the saddle, which is 2/64″.
Remove: 2/64″ equally from the base of the saddle.
Having a calliper will come in handy for marking precise measurements. Take a pencil and mark off 2/64″ from the bottom of the saddle, as pictured below. Lay a piece of coarse-grit sandpaper on a flat surface and sand the bottom of the saddle down to the pencil marks. Move the saddle back and forth along the sandpaper, using gentle, even pressure. Be careful to keep the saddle upright while doing so or one side will become lower than the other. An uneven saddle will not sit in the slot properly and may produce poor tone. Also, if you have an under-the-saddle pickup, it must make firm contact with the entire base of the saddle, or it may produce uneven string balance when amplified.
Once the appropriate amount of material has been removed, reinstall the saddle and strings to test the guitar. If you’ve been precise, the resulting string height will have changed to the specifications intended. If it is not, repeat the process carefully until correct.
Raising the String Height
If you need to raise the string height, use the same method of calculation to get the desired result. For example, to raise the string height by 1/64”, raise the saddle twice that by 2/64”. You can use cardstock, veneer, or flat toothpicks as shim material and lay it freely into the saddle slot (underneath the saddle). The shim should match the thickness needed, as well as the footprint of the saddle as closely as possible. Because this can be tricky, an alternative method is to glue some wood veneer to the base of the saddle (with cyanoacrylate/crazy glue) and then sand it down incrementally until perfect.


Great information–something I can measure and deal with. Technical specifics help a lot!!
Thx a bunch!!
Thanks for the information. Something that thought would be scary to undertake looks easy enough. Had the guitar kicking around for 30 years and not really played it until recently. Needs a little work.
In the lower picture showing the two arrows for sanding down the saddle, it is dangerous to trust the fingers, alone, to sand the saddle perfectly level. A much safer way is to use two small, flat boards placed at a 90-degree angle to each other and with a piece of 150-grit non-loading sandpaper affixed to one board. Then the saddle can be safely set against the one board and slid left-to-right without sanding mistakes on the bottom of the saddle. The saddle bottom will have to be perfectly flat all along the bottom, then, using the flat board to guide it as it is sanded. After the 150-grit has the saddle depth correct, turn to 400-grit paper to make the bottom edge smooth, using the same two-board method.